


Venison is the most expensive meat on earth.
But it’s just deer, right? Yes, but there’s more to the story.
There’s no doubt about it, when you’re tallying a grocery list that requires time spent in the field to acquire your meat-based protein, the costs are going to add up. In fact, when you figure the expenses associated with hunting — paying for a lease or hiring an outfitter, shelling out dough for good gear and making sure you have all the other necessary provisions — the price per pound is astronomical compared with perusing the local meat market.
However, I’d rather do my hunting and gathering in the woods instead of stalking the aisles of my nearby H-E-B if I can avoid it. The kind folks at that Texas institution also don’t cotton to scaring your neighbors with head-to-toe camo and a hearty smudge of facepaint, but it’s no offense on their selection that I prefer to eat wild.
If you’re lucky, you’ve got a land-owning friend or family member, or have been successful in drawing public hunting permits to help stock your freezer. If you’re really lucky, you’ve been successful in drawing a hunt or hunts for your kids, which in Texas means they can shoot deer on public lands for free as long as they’ve got an adult to chaperone their efforts.
Regardless of how you’re able to end up processing your kills, make sure that you take extra special care of the top cut of meat on a whitetail — the tenderloins.
I know, I know. The backstraps are the filet mignon of free-range fare and they get most of the love from hunters because they’re larger and meatier. The fact that they’re scrumptious is indisputable, and really it’s sort of like picking your favorite child when discussing the prime cuts of venison.
However, for my efforts, the tenders are tops. They certainly don’t carry the same girth as the forearm-length cuts alongside the backbone that everyone loves to hoist up in Instagram snapshots along with a caption about eating organic, but the tenderloins are just melt-in-your-mouth delicious. They also are so tender that you can actually pull them out with your fingers instead of possibly losing any portion of this choice protein to a bad knife job. Losing any fragment of this wild game experience is the worst, and actually drives up your price per pound if you really think about, so make sure you’ve practiced your knife skills if you’re even the least bit rusty before processing any game.
After you’ve dissected the meat and fully processed the carcass, the next step is critical with tenderloins: Eat them as soon as humanly possible and don’t freeze them. This is why we hunt, after all, to enjoy robust fare and the experience that comes with bringing it to our dinner table.
Now, I’m not saying you can’t freeze them, but this delicacy is best when served fresh. You certainly can age it for a couple of days on ice or in the refrigerator, but the meat is so tender (hence the name) that it’s really unnecessary.
Based on personal experience, I would advise you to age other cuts of venison like the front quarters and hindquarters, as well as trimmings from the neck and other areas that may go into stew, chili, soup, sausage or any other host of hearty dishes. The easiest way is to wet age the meat for about a week in a big cooler, adding and replacing ice as needed, and draining out the bloody water at the bottom that should turn clear after a few days in the process.
I also would advise that you age venison on the hoof, if possible, letting the deer hang for at least a day if temperatures allow. Ideally, you want to keep the meat above freezing and right around the 40-degree mark to keep bacteria from taking over. If that’s not possible — I’ve been on December hunts in Texas when afternoon temperatures hovered in the high 70s or low 80s — the cooler aging method works like a charm.
What you should avoid at all costs is butchering a deer or other hoofed critter and freezing the meat right away. Allowing rigor mortis to fully set in and pass takes at most a day, but it’s worth it to take the time and not stock your freezer with any subpar wild vittles.
When it comes to infusing fancy flavor and aromatic whimsy into the venison you’ve worked hard to procure with gun or bow, you can’t beat a good marinade. There are endless varieties of sweet, spicy and downright tangy concoctions in which you can bathe venison for hours.
One tip, if you’re going the marinade route, is to make your own. Many store-bought marinades contain extra salt and other “stuff” that doesn’t add any real value and just aren’t part of a healthy diet. If you need one that can’t be beat, simply add your venison to a large Ziploc bag and top with olive oil, Worcestershire sauce, yellow mustard, diced garlic, rosemary, and salt and black pepper. Not much to it, but let it sit for six to eight hours in that mixture and you’ll thank me later!
However, for nights when you need a quick and easy cook, you simply can’t top this venison recipe. It’s also applicable to backstraps, another of my favorite meals supplied by Mother Nature. As with marinades, there are a variety of ways to add flavor and make it your own. It’s never a bad thing to incorporate other ingredients such as jalapenos, onions, cream cheese and mushrooms into the mix.
There’s no wrong way to prepare venison, which is a fact rooted in thousands of ways to eat deer meat, but there’s one mortal sin for most deer-eating aficionados: Overcooking your meat. Some folks like only a 1-minute sear on each side regardless of the recipe, and that’s fine, but if you’ve got youngsters at home that haven’t yet acclimated their palates to rare, it’s fine to let venison cook a little bit longer.
Whether it’s oven or grill, charcoal or mesquite, cast iron or baking dish, the key is to let the deer meat remain the star of the show!
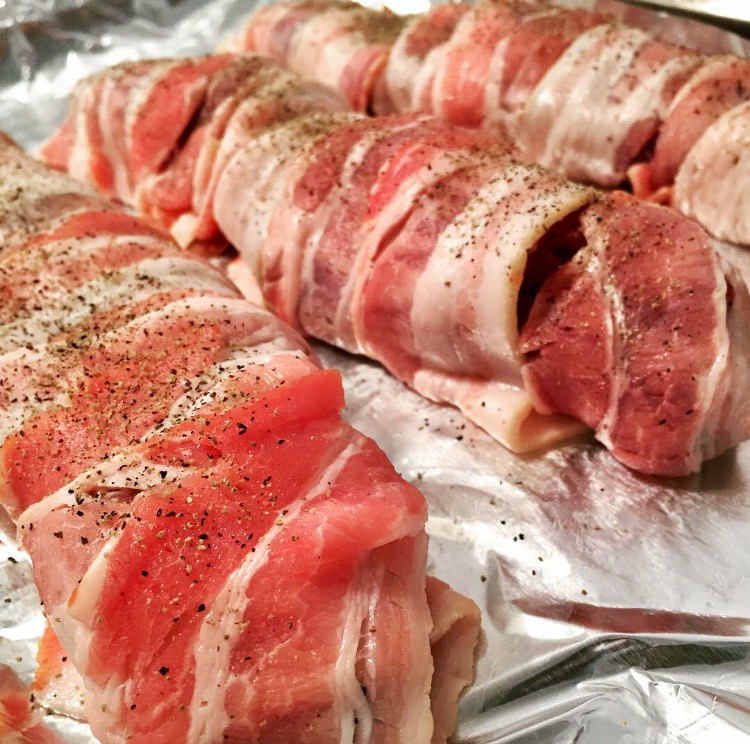 Simple bacon-wrapped venison
Ingredient List
4 venison tenderloins (you also can use backstraps — one big one can feed a small family!)
Bacon (they do make lower-sodium trimmings of pig if you’re so inclined)
Sea salt
Black pepper
* Yes, that’s it, but if you want to add in other stuff, feel free to experiment; you also can butterfly tenderloins and backstraps, add in cooked mushrooms and onions and cream cheese in the center, and then wrap it all securely closed in bacon
Instructions
Preheat your oven to 350 degrees.
Place your tenders on a baking tray and sprinkle with salt and pepper.
Remove the bacon from the packaging, and starting at the end, make loops covering the venison. Some folks would say to secure the wraps with toothpicks evenly spaced as you go but it’s not absolutely necessary. If you want to make finger foods for the weekend’s big game easily accessed from the end of a toothpick, go right ahead.
Layer each wrap of bacon out so that the entire cut of venison is covered from end to end.
Dust the top of the bacon with pepper and more salt, unless you’re using bacon that’s already peppered and ready to go, in which case you’re a genius.
Place the bacon-wrapped goodness in the oven and bake at 350 for 30 minutes to achieve a medium burn. For medium rare, cut it to 20 minutes, and for rare take it down farther.
To crisp up the bacon, turn your broiler on high for the last five minutes. You also can do a quick sear on medium-high heat with your grill or sear each one in a hot cast-iron pan for a minute on each side for more crunch. If you want to sweeten the recipe, add a dusting of brown sugar before the final sear.
After you’ve achieved your desired cook, remove from heat and let rest for a few minutes.
If you used toothpicks, cut the meat between each one so that you’ve got a chunk of tender surrounded by bacon, all at the end of a convenient handle. If you want to leave them whole and eat using a fork and knife, that’s fine, too.

